- Published on
자바스크립트 클래스
- Authors
- Name
- Na Hyunwoo


뜬금없이 클래스를 공부하는 이유
최근 리액트를 사용하면서 클래스 문법을 마주친 적이 없긴 하지만..! 자바스크립트에서 클래스는 너무나도 중요한 개념이다. 객체 지향 언어의 뼈대를 이루는 클래스, 특히 자바스크립트의 클래스를 다시 학습하면서 자바스크립트에 대한 이해도를 높이고자 함이다.
아래 포스팅은 https://ko.javascript.info/classes과 모던 자바스크립트 책을 읽고 중요한 부분을 발췌 정리한 내용입니다.
클래스와 기본 문법
객체 지향 프로그래밍에서 클래스는 특정 객체를 생성하기 위해 변수와 메서드를 정의하는 일종의 틀로, 객체를 정의하기 위한 상태와 메서드로 구성됩니다.
그래서 이를 설명할 때, 붕어빵을 찍어내는 틀을 클래스로, 틀로 찍어서 나온 붕어빵을 인스턴스에 비유합니다.
기본 문법
// 클래스는 다음과 같이 생성할 수 있습니다.
class User {
  constructor(name) {
    this.name = name
  }

  // 메서드 사이에 쉼표를 넣지 않습니다.
  sayHi() {
    alert(this.name)
  }
}

// 다음과 같이 클래스를 호출합니다.
const user = new User('John')
user.sayHi()
이 때, 객체의 기본 상태를 설정해주는 생성자 메서드 constructor는 new에 의해 자동으로 호출됩니다.
클래스란 ?
자바스크립트에서 클래스는 함수의 한 종류입니다.
예시)
class User {
  constructor(name) {
    this.name = name
  }
  sayHi() {
    alert(this.name)
  }
}

alert(typeof User) // function
class User 가 실행되면 다음의 과정을 거칩니다.
- User라는 이름을 가진 함수를 만듭니다. User 함수 본문은 constructor에서 가져옵니다.
- sayHi 같은 메서드는 User.prototype에 저장됩니다.

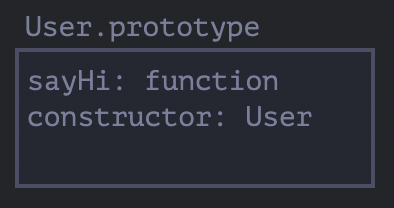
코드로 살펴보면 다음과 같습니다.
class User {
  constructor(name) {
    this.name = name
  }
  sayHi() {
    alert(this.name)
  }
}

alert(User === User.prototype.constructor) // true

alert(User.prototype.sayHi) // alert(this.name);

alert(Object.getOwnPropertyNames(User.prototype)) // constructor, sayHi
클래스와 생성자 함수의 차이
클래스는 함수이며 기존 프로토타입 기반 패턴을 클래스 기반 패턴처럼 사용할 수 있도록 하는 문법적 설탕이라고 부를 수도 있습니다. 그러나 클래스와 생성자 함수가 정확히 동일하게 동작하지는 않습니다.
차이점
- 클래스는 new 연산자 없이 호출하면 에러가 발생합니다. 그러나 생성자 함수를 new 연산자 없이 호출하면 일반 함수로서 호출됩니다.
- 클래스는 extends, super와 같은 기능을 제공합니다.
- 클래스는 호이스팅이 발생하지 않는 것처럼 동작합니다. 반면에, 생성자 함수는 함수의 호이스팅과 동일하게 동작합니다.
- 클래스 내의 모든 코드는 암묵적으로 strict mode가 지정되어 해제할 수 없습니다. 반면에 생성자 함수는 암묵적으로 strict mode가 지정되지 않습니다.
- 클래스의 constructor, 프로토타입 메서드, 정적 메서드는 모두 열거되지 않습니다. 즉, for..in을 사용할 수 없습니다.
이와 같이 클래스는 생성자 함수보다 견고하고 명료합니다. 따라서, 클래스를 단순히 문법적 설탕이라고 보기보다는 새로운 객체 생성 메커니즘으로 보는 것이 더 합당하다고 할 수 있습니다.
getter와 setter
class User {
  constructor(name) {
    // setter를 활성화합니다.
    this.name = name
  }

  get name() {
    return this._name
  }

  set name(value) {
    this._name = value
  }
}

let user = new User('현우')
alert(user.name) // 현우
여기서 헷갈렸던 점은 get name, set name 함수 내부에서 this._name을 사용하는 것이였다.
왜 굳이 언더바를 붙이는것일까 ? 이는 밑에서 다른 의문들과 함께 해결된다. ☺️
클래스 필드
‘클래스 필드’라는 문법을 사용하면 프로퍼티를 클래스에 추가할 수 있습니다.
class User {
  name = '현우' // 클래스 필드가 사용된 부분

  sayHi() {
    alert(`${this.name}님 안녕하세요!`)
  }
}

new User().sayHi() // 현우님 안녕하세요!
다만, 클래스 필드는 User.prototype이 아닌 개별 객체에만 설정됩니다.
class User {
  name = '현우'
}

let user = new User()
alert(user.name) // 현우
alert(User.prototype.name) // undefined
화살표 함수로 this 정적 바인딩하기
객체 메서드를 여기저기 전달해 다른 컨텍스트에서 호출하면 this는 참조값을 잃습니다.
class Button {
  constructor(value) {
    this.value = value
  }

  click() {
    alert(this.value)
  }
}

let button = new Button('안녕하세요.')

setTimeout(button.click, 1000)
이를 화살표 함수를 통해 우아하게 처리할 수 있습니다.
class Button {
  constructor(value) {
    this.value = value
  }
  click = () => {
    alert(this.value)
  }
}

let button = new Button('안녕하세요.')

setTimeout(button.click, 1000) // 안녕하세요.
화살표 함수 안에서의 this 키워드는 바로 바깥쪽 스코프에 존재하는 this와 같은 객체를 가리킵니다.
화살표 함수의 this는 호출 형태에 관계없이 항상 인스턴스 객체를 가리킵니다.
적용해보기
다음 함수 Clock을 클래스로 바꿔봅시다.
<!doctype html>
<script>

  function Clock({ template }) {

    let timer;

    function render() {
      let date = new Date();

      let hours = date.getHours();
      if (hours < 10) hours = '0' + hours;

      let mins = date.getMinutes();
      if (mins < 10) mins = '0' + mins;

      let secs = date.getSeconds();
      if (secs < 10) secs = '0' + secs;

      let output = template
        .replace('h', hours)
        .replace('m', mins)
        .replace('s', secs);

      console.log(output);
    }

    this.stop = function() {
      clearInterval(timer);
    };

    this.start = function() {
      render();
      timer = setInterval(render, 1000);
    };

  }

  let clock = new Clock({template: 'h:m:s'});
  clock.start();

</script>

</html>
바꾼 결과
class Clock {
  constructor({ template }) {
    this.template = template
  }

  render() {
    let date = new Date()

    let hours = date.getHours()
    if (hours < 10) hours = '0' + hours

    let mins = date.getMinutes()
    if (mins < 10) mins = '0' + mins

    let secs = date.getSeconds()
    if (secs < 10) secs = '0' + secs

    let output = this.template.replace('h', hours).replace('m', mins).replace('s', secs)

    console.log(output)
  }

  stop() {
    clearInterval(this.timer)
  }

  start() {
    this.render()
    this.timer = setInterval(() => this.render(), 1000)
  }
}

let clock = new Clock({ template: 'h:m:s' })
clock.start()
start에서 render를 두 번 호출하는 이유: setInterval을 사용해서 1초 간격으로 시간을 출력한다. 그러나, 최초에 start시에도 1초 후에 시간이 출력되기 때문에 최초 시간을 호출하기 위해 render 함수를 먼저 호출해준다.
처음에는 함수랑 헷갈려서 timer라는 변수를 선언한 곳이 없는데 어떻게 값이 할당되지 ?? 라는 의문이 들었다. 그래서 직접 코드를 실행해봤다.
class User {
  constructor(firstName, lastName, age) {
    this.firstName = firstName
    this.lastName = lastName
  }

  start() {
    this.future = 'success'
  }
}

const user = new User('Na', 'Hyunwoo', 25)

user.start()

console.log(user)


클래스 안에서 this.future에 값을 할당하면 user의 프로퍼티 값으로 future가 생성된다.
그렇다면 이를 통해서 getter, setter는 따로 구현하지 않아도 기본적으로 동작한다는 것을 알 수 있다.
추가적으로 위에서 의문을 가졌던 this._age에 대한 해답도 구할 수 있었다. 즉, _age에 대한 선언 없이도 this._age에 값을 할당하면 프로퍼티가 생성된다 !
클래스 상속
클래스 상속을 사용하면 클래스를 다른 클래스로 확장할 수 있습니다.
extends 키워드
먼저, 클래스 Animal을 만들어보겠습니다.
class Animal {
  constructor(name) {
    this.speed = 0
    this.name = name
  }
  run(speed) {
    this.speed = speed
    alert(`${this.name} 은/는 속도 ${this.speed}로 달립니다.`)
  }
  stop() {
    this.speed = 0
    alert(`${this.name} 이/가 멈췄습니다.`)
  }
}

let animal = new Animal('동물')
Animal을 상속한 Rabbit을 만들어보겠습니다.
class Rabbit extends Animal {
  hide() {
    alert(`${this.name} 이/가 숨었습니다!`)
  }
}

let rabbit = new Rabbit('흰 토끼')

rabbit.run(5) // 흰 토끼 은/는 속도 5로 달립니다.
rabbit.hide() // 흰 토끼 이/가 숨었습니다!
Rabbit 클래스는 class Rabbit과 class Animal에 정의된 메서드에 동시에 접근할 수 있습니다.
extends는 프로토타입을 기반으로 동작합니다. 만약 Rabbit.prototype에서 메서드를 찾지 못하면 Animal.prototype 메서드를 가져옵니다. (프로토타입 체이닝)

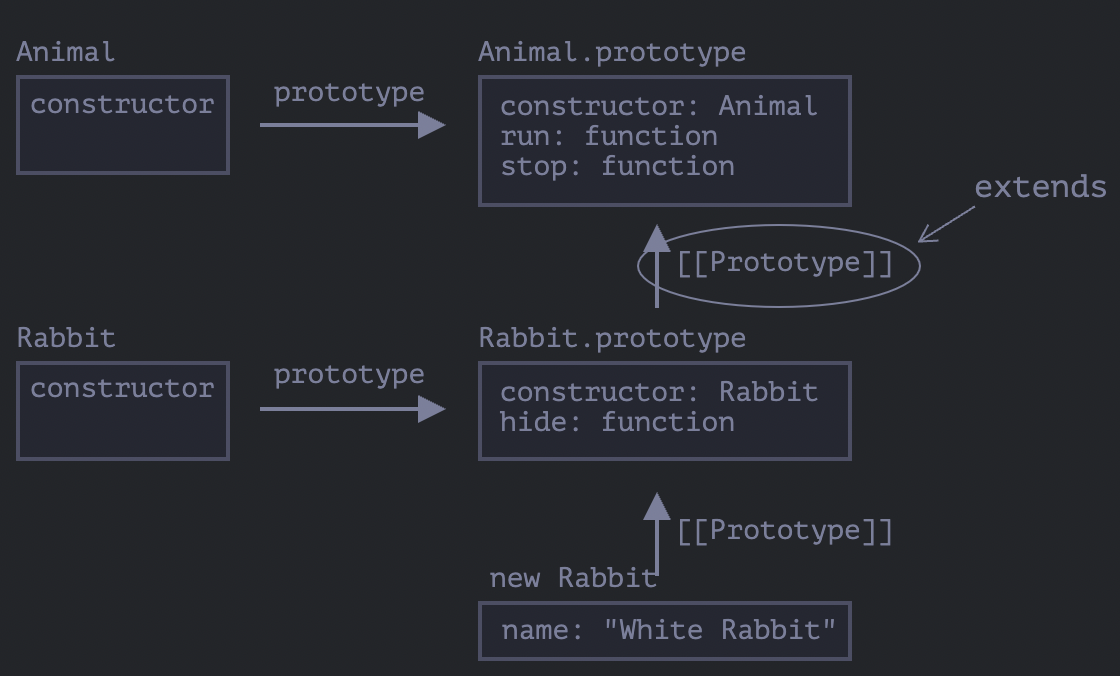
자바스크립트의 내장 객체는 프로토타입을 기반으로 상속 관계를 맺습니다. Date.prototype.[[Prototype]]이 Object.prototype인 것처럼요. 이것은 Date 객체에서 일반 객체 메서드를 사용할 수 있는 이유입니다.
메서드 오버라이딩
만약, Rabbit에서 stop() 등의 메서드를 자체적으로 정의하면, 상속받은 메서드가 아닌 자체 메서드를 사용합니다. 이를 메서드 오버라이딩이라고 합니다.
class Rabbit extends Animal {
  stop() {
    // ...
  }
}
만약, 부모 메서드를 호출하고 싶을때는 어떻게 할까요 ? 이 때는, super 메서드를 사용합니다. 이는 자식 생성자 내부에서만 사용할 수 있습니다.
class Animal {
  constructor(name) {
    this.speed = 0
    this.name = name
  }

  run(speed) {
    this.speed = speed
    alert(`${this.name}가 속도 ${this.speed}로 달립니다.`)
  }

  stop() {
    this.speed = 0
    alert(`${this.name}가 멈췄습니다.`)
  }
}

class Rabbit extends Animal {
  hide() {
    alert(`${this.name}가 숨었습니다!`)
  }

  stop() {
    super.stop() // 부모 클래스의 stop을 호출해 멈추고,
    this.hide() // 숨습니다.
  }
}

let rabbit = new Rabbit('흰 토끼')

rabbit.run(5) // 흰 토끼가 속도 5로 달립니다.
rabbit.stop() // 흰 토끼가 멈췄습니다. 흰 토끼가 숨었습니다!
생성자 오버라이딩
생성자 오버라이딩 시에는 반드시 super를 호출해 부모 생성자를 실행해주어야 합니다.
class Animal {
  constructor(name) {
    this.speed = 0
    this.name = name
  }

  // ...
}

class Rabbit extends Animal {
  constructor(name, earLength) {
    super(name)
    this.earLength = earLength
  }

  // ...
}

// 이제 에러 없이 동작합니다.
let rabbit = new Rabbit('흰 토끼', 10)
alert(rabbit.name) // 흰 토끼
alert(rabbit.earLength) // 10
그 이유는 다음과 같습니다. 일반 클래스는 new와 함께 실행되면, 빈 객체가 만들어지고 this에 이 객체를 할당합니다. 이와같은 this에 해당 객체를 할당하는 것은 부모 클래스의 일로 여겨지기 때문에 상속받은 클래스의 경우 위의 과정이 일어나지 않습니다.
예제를 통해 배워보기
다음과 같은 class Clock을 상속받아
class Clock {
  constructor({ template }) {
    this.template = template
  }

  render() {
    let date = new Date()

    let hours = date.getHours()
    if (hours < 10) hours = '0' + hours

    let mins = date.getMinutes()
    if (mins < 10) mins = '0' + mins

    let secs = date.getSeconds()
    if (secs < 10) secs = '0' + secs

    let output = this.template.replace('h', hours).replace('m', mins).replace('s', secs)

    console.log(output)
  }

  stop() {
    clearInterval(this.timer)
  }

  start() {
    this.render()
    this.timer = setInterval(() => this.render(), 1000)
  }
}
다음과 같이 사용할 수 있는 class ExtendedClock을 만들어보세요.
let lowResolutionClock = new ExtendedClock({
  template: 'h:m:s',
  precision: 10000,
})

lowResolutionClock.start()
constructor에서 super를 사용해야 하는 점과, this.precision을 사용하는 것에 유의하면 된다.
class ExtendedClock extends Clock {
  constructor({ template, precision }) {
    super({ template })

    this.precision = precision || 1000
  }

  start() {
    super.render()
    this.timer = setInterval(() => super.render(), this.precision)
  }
}
정적 메서드와 정적 프로퍼티
prototype이 아닌 클래스 함수 자체에 메서드를 설정할 수 있습니다. 이런 메서드를 정적 메서드라고 부릅니다. 다음과 같이 사용할 수 있습니다.
class User {
  static staticMethod() {
    alert(this === User)
  }
}

User.staticMethod() // true
정적 메서드는 인스턴스가 아닌 클래스에 속한 함수를 구현하고자 할 때 주로 사용됩니다.
정적 메서드는 특정 클래스 인스턴스가 아닌 클래스 ‘전체’에 필요한 기능을 만들 때 사용할 수 있습니다.
private, protected 프로퍼티와 메서드
객체 지향 프로그래밍에서 가장 중요한 원리 중 하나는 ‘내부 인터페이스와 외부 인터페이스를 구분 하는 것’입니다. 만약 사용자들이 커피 머신을 사용하려고 할 때마다 오른쪽의 사진의 복잡한 구조들을 일일이 실행해야 한다면 그건 굉장히 번거롭고 위험한 일입니다. 따라서, 이렇게 내부 인터페이스와 외부 인터페이스를 구분 짓는 것은 굉장히 중요한 일입니다.
프로그래밍에서 객체는 커피 머신과 같습니다.


내부 인터페이스와 외부 인터페이스
객체 지향 프로그래밍에서 프로퍼티와 메서드는 두 그룹으로 분류됩니다.
- 내부 인터페이스 - 동일한 클래스 내의 다른 메서드에선 접근할 수 있지만, 클래스 밖에선 접근할 수 없는 프로퍼티와 메서드
- 외부 인터페이스 - 클래스 밖에서도 접근 가능한 프로퍼티와 메서드
이렇게 인터페이스를 구분짓는 것을 캡슐화라고 합니다.
프로퍼티 보호하기
자바스크립트에서 protected를 지원하지 않지만, 그렇게 동작하게 할 수는 있습니다.
class CoffeeMachine {
  _waterAmount = 0

  set waterAmount(value) {
    if (value < 0) throw new Error('물의 양은 음수가 될 수 없습니다.')
    this._waterAmount = value
  }

  get waterAmount() {
    return this._waterAmount
  }

  constructor(power) {
    this._power = power
  }
}

// 커피 머신 생성
let coffeeMachine = new CoffeeMachine(100)

// 물 추가
coffeeMachine.waterAmount = -10 // Error: 물의 양은 음수가 될 수 없습니다.
팁: 밑줄(_)은 프로그래머들 사이에서 외부 접근이 불가능한 식별자를 나타낼 때 사용합니다.
의문점
객체 지향 언어에서 protected는 본래 클래스 자신과 자손 클래스에서만 지원하는 건데, 위의 코드처럼 사용하면 외부에서 접근할 수 있는거 아닌가요…? 이게 왜 protected임? protect가 안되고 있는거 아닌가요 .. ?
→ _waterAmount에 굳이 직접 접근할 수는 있겠지만, 코드적으로 protected한 변수라고 명시를 해주었고 더불어서, _waterAmount에 접근하는 메서드들을 정의해주었기 때문에 protected와 같이 사용할 수 있다는 의미인 것 같다 !
읽기 전용 프로퍼티
setter는 만들지 않고 getter만 만들면 됩니다.
class CoffeeMachine {
  // ...

  constructor(power) {
    this._power = power
  }

  get power() {
    return this._power
  }
}

// 커피 머신 생성
let coffeeMachine = new CoffeeMachine(100)

alert(`전력량이 ${coffeeMachine.power}인 커피머신을 만듭니다.`) // 전력량이 100인 커피머신을 만듭니다.

coffeeMachine.power = 25 // Error (setter 없음)
private 프로퍼티
최근에 추가된 문법이므로 해당 기능을 지원하는지 확인이 필요합니다.
private 프로퍼티와 메서드는 #으로 시작합니다.
class CoffeeMachine {
  #waterLimit = 200

  #checkWater(value) {
    if (value < 0) throw new Error('물의 양은 음수가 될 수 없습니다.')
    if (value > this.#waterLimit) throw new Error('물이 용량을 초과합니다.')
  }
}

let coffeeMachine = new CoffeeMachine()

// 클래스 외부에서 private에 접근할 수 없음
coffeeMachine.#checkWater() // Error
coffeeMachine.#waterLimit = 1000 // Error
instanceof로 클래스 확인하기
instanceof 연산자를 사용하면 객체가 특정 클래스에 속하는지 아닌지를 확인할 수 있습니다. instanceof는 상속 관계도 확인해줍니다.
let arr = [1, 2, 3]
alert(arr instanceof Array) // true
alert(arr instanceof Object) // true
얻은 점
기존에는 너무 당연해 보이는 예제나 이해가 되는 예제에 대해서는 따로 코드를 작성 하지않았다. 그러나, 이번에는 너무 당연해보이는 코드들도 직접 따라치다보니 그때마다 약간의 깨달음들이 있었다. 그냥 텍스트를 쭉쭉 읽었을 때보다 이해도가 높아지는 느낌이 들었다. 그래서 다음부터는 손에 익힌다는 생각으로 간단한 예제들도 따라쳐보면서 학습해봐야겠다.
참고
객체 지향 언어란 ?
프로그램을 다수의 객체로 만들고, 객체끼리 상호작용하도록 만든 프로그래밍 언어